Fraction Designer
Design your own fractions examples
How To Use Fraction Designer
With Multiply with Lines you can make an array of the product of 2 1/2 X 2 1/2:
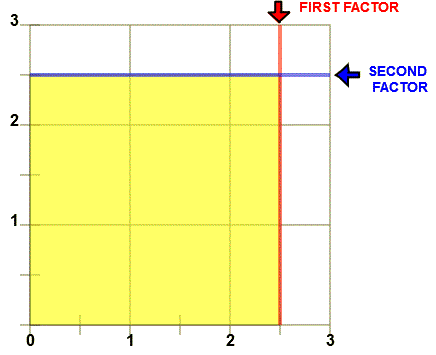
You can uncheck EXPLAIN and ask the students to add up the rectangles in the array. Shown are four whole rectangles plus four 1/2 rectangles plus one 1/4 rectangle for a total of 6 1/4 rectangles.
These Designer pages enable you to control the fraction image should you want to study for yourself or demonstrate for others.
See more suggestions for demonstrating some important mathematics principals with the Number System Properties page.
To The Learner:
If you are beginning to learn fractions, start with the Identify Fractions programs and continue to Rename Fractions, Compare Fractions, Add Fractions, Subtract Fractions, Multiply Fractions, and Divide Fractions. Experiment with different patterns by increasing and decreasing the size of fractions.
You can use this Fraction Designer to see how naming, renaming, comparing, adding, subtracting, multiplying, and dividing fractions are modeled.
There are helpful suggestions on the INSTRUCTION section of each page.
To The Teacher:
Demonstrate examples with a classroom projector. You can show suggested number patterns given on the INSTRUCTION section of each page. Each program will allow you to remove the answer should you wish to question students in class.
With Windows XP™ computers you can make worksheet examples by pressing the <Print Screen> button on the keyboard. This copies the screen into Windows Clipboard™. You can then paste the image into Windows Paint™ or into your favorite imaging program.
Each program will allow you to turn off the colored answer, the explanation and even the numbers you input, allowing you to ask the student how to simplify any modeled fraction example.
Windows users can select any part of the screen by right clicking and selecting "Take a screenshot". Adjust to fit mage you want. This copies the selection into Windows Clipboard™. The screen can then be pasted into Windows Paint™ or your favorite imaging program. Or you can select "Download" which will put the image into your files "Download" folder.
To take a screen shot with the IPAD first press the Sleep/Wake button at the top right of the Ipad. While holding the Sleek/Wake button press and release the round Home button at the bottom of the screen. You should see a photo of the screen by going to the Home page and pressing the Photos icon.