Rename lower with line models
Learn or teach by designing your own rename to lower terms visual examples. All examples are modeled with number lines.
INSTRUCTIONS
Rename to Lower Terms with Number Line Models uses number lines to demonstrate how a fraction can be renamed to lower terms.The following equivalent fractions were made from Rename to Lower Terms:

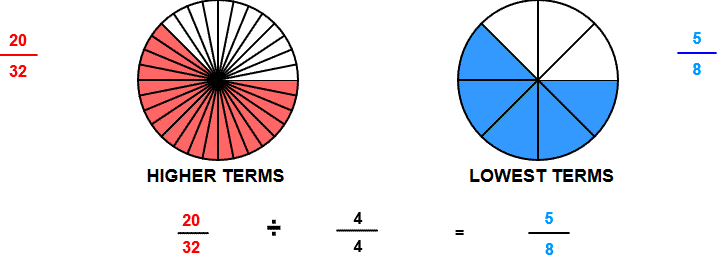
When the program starts, you will be shown two fractions. The fractions are equivalent, but both the numerator and denominator of the second fraction are in lower terms.
The example shows that the first fraction will not change in value if the numerator and denominator are divided by the same number. In the above image, both the numerator and denominator are divided by 4.
The fraction you enter will be the answer in lower terms. The multiplier will multiply terms of the fraction you enter to give the first fraction in higher terms.
Although we chose a multiplier 4 we are multiplying the chosen fraction by 4⁄4 , a form of one.
You can input a fraction less than one and a multiplier less than 100.
With <EXPLAIN> and <SHOW INPUT> unchecked you can ask your students to complete the number sentence.
With <EXPLAIN> and <SHOW COLOR> unchecked you can ask your students to shade the number lines and write in lowest terms.
Suggestions:
Turn color and explain off and demonstrate how much of each number line should be shaded. Then write the fraction in lower terms.
Keep the fraction the same size, but increase the size of the multiplier. Observe that there are many ways to name the fraction.
Choose a fraction in lowest terms. The multiplier you choose will be the greatest common factor of the numerator and denominator.
Choose a fraction in higher terms. The multiplier will be a common factor, but not the greatest common factor.
WINDOWS COMPUTERS
Windows users can select any part of the screen by right clicking and selecting "Take a screenshot". Adjust to fit mage you want. This copies the selection into Windows Clipboard™. The screen can then be pasted into Windows Paint™ or your favorite imaging program. Or you can select "Download" which will put the image into your files "Download" folder.
IPADS
To take a screen shot with the Ipad first press the Sleep/Wake button at the top right of the Ipad. While holding the Sleek/Wake button press and release the round Home button at the bottom of the screen. You should see a photo of the screen by going to the Home page and pressing the Photos icon.
